Once we have crypto in our exchange account, we’ll want to create a Web3 wallet so that we can move our crypto from the exchange into the wallet. This is where the world of Web3 decentralization begins, and there’s a lot that will be new here for first-time Web3 users. Also, this is just the beginning of Web3 tutorials for product designers. Stay tuned for future Web3 Design Courses covering nascent dApps that are sure to disrupt the internet as we know it today.
Let’s start by creating a wallet with the most popular crypto wallet app, MetaMask. MetaMask is a Chrome browser extension that can be downloaded through the Google extension store. There are other types of wallets like desktop and mobile apps, but browser extensions are the most popular form factor for Web3 wallets. Let’s now look at the process for creating a Web3 wallet.
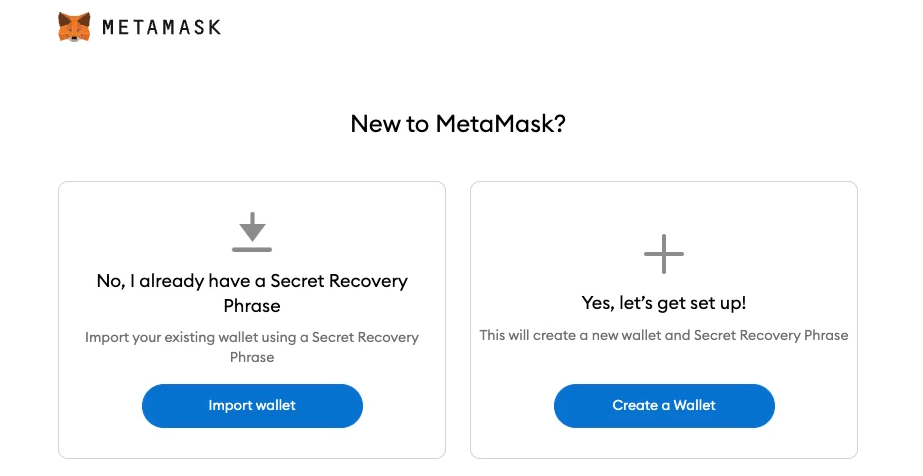
First, users need to install the MetaMask extension on their Chrome browser. Clicking on the MetaMask extension will launch an onboarding screen for MetaMask, and there are two user flows from here: create new wallet and import existing wallet. The ladder has to do with recovering a wallet, which we’ll look at later. For now, we will create a new wallet.
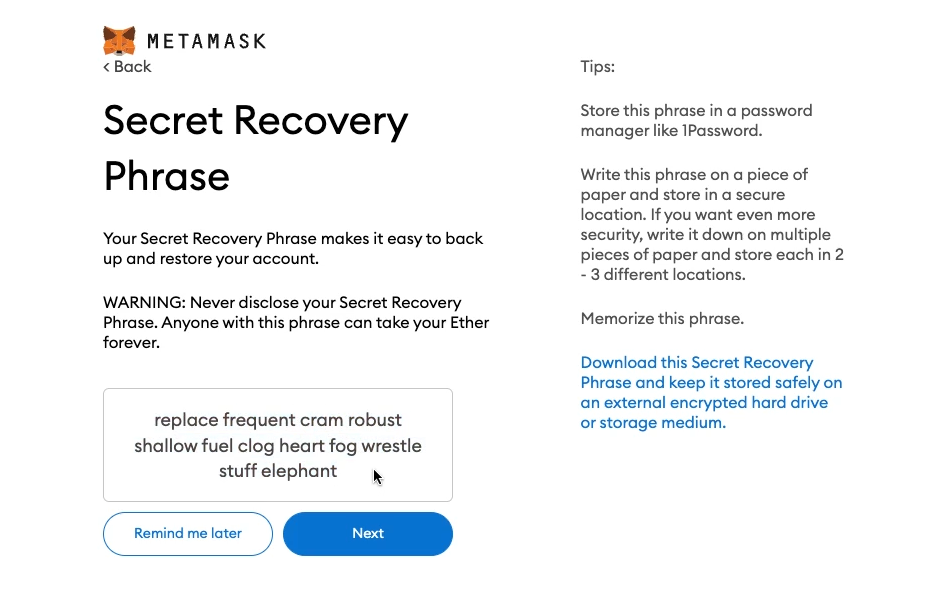
MetaMask generates a new wallet, and displays something called a “secret recovery phrase” for the user to copy. The secret recovery phrase is a series of 12 to 24 everyday words, and is the master password for the Web3 wallet. Anyone with this phrase can import the wallet into their MetaMask application, and access the crypto associated with the wallet. Users usually write this down on a physical piece of paper, and store it somewhere safe (like a safety deposit box) for security reasons. On the next screen, MetaMask requires the user to retype the secret recovery phrase to ensure the user copied it down correctly in the first place.
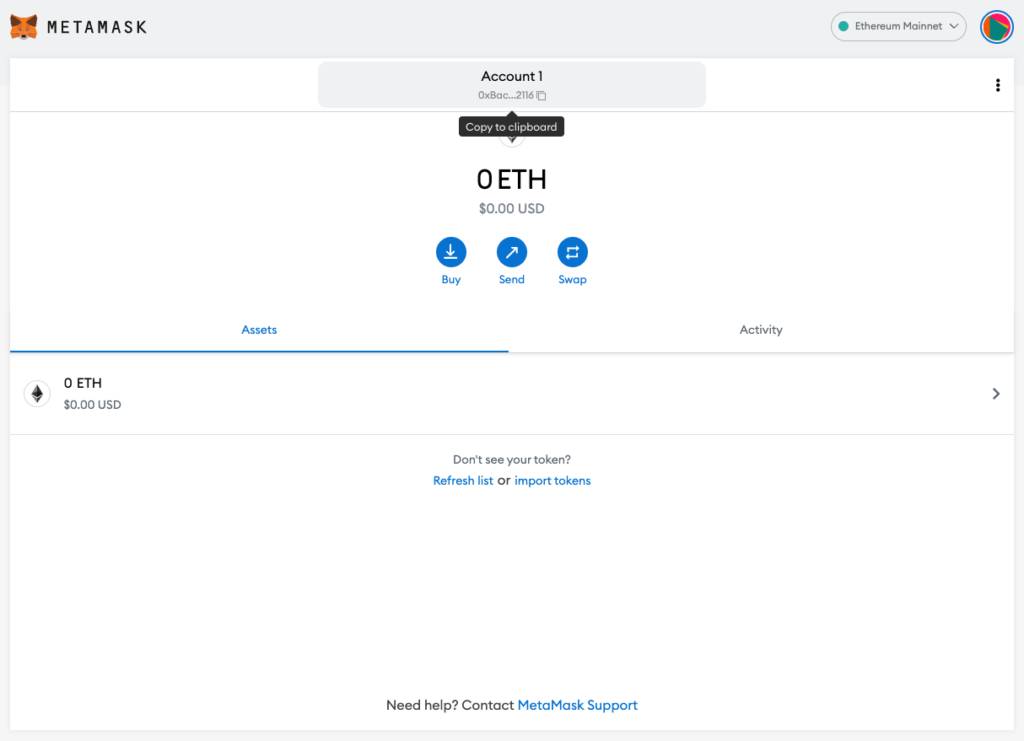
Users can access the wallet’s main UI once the secret recovery phrase has been backed-up. For now we will just look at the wallet’s address at the top center of the UI. The address is a unique, public identifier for the wallet, and we copy it to our clipboard in order to send crypto from the exchange into the wallet. You can think of the wallet address like an email address. Remember, sending crypto from the exchange to the wallet is an important transitory step to go from centralized apps to decentralized apps.
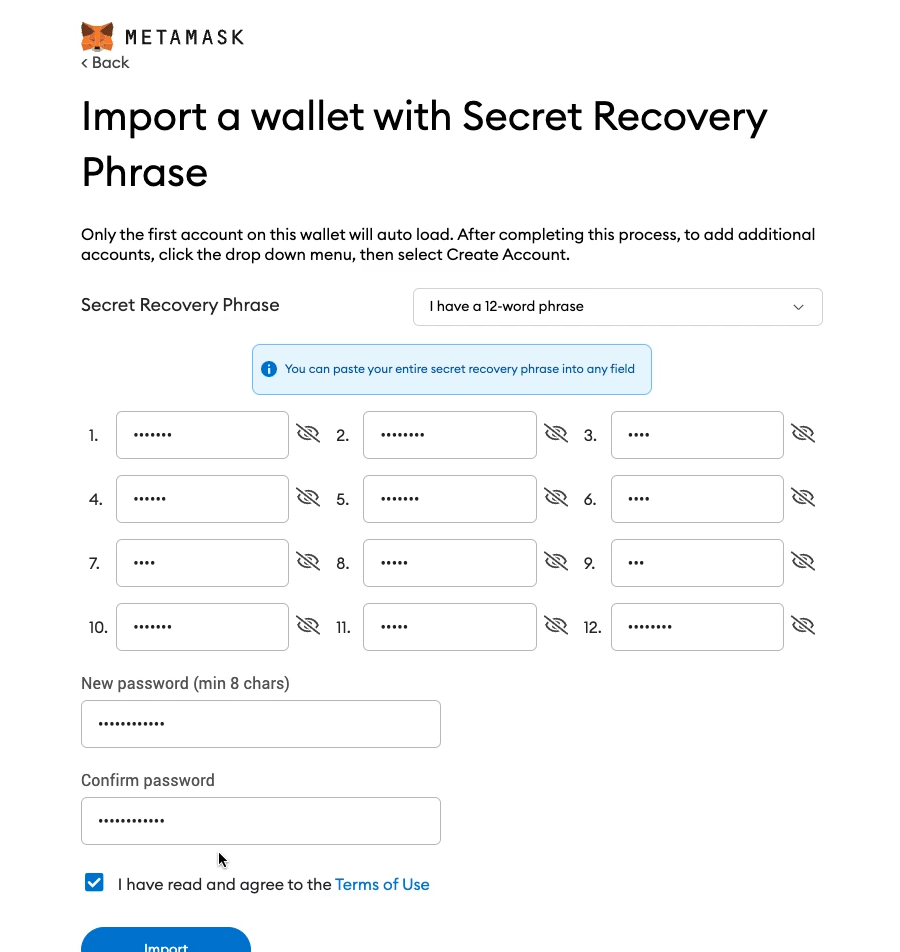
Now, let’s say you change computers, and need to redownload MetaMask. Or your MetaMask extension gets deleted from Chrome. In order to regain access to your wallet, you’ll need to recover your wallet using your secret backup phrase. Let’s see how this works by going back to the initial MetaMask onboarding screen, and importing an existing wallet. The user simply enters the secret recovery phrase, and their Web3 wallet gets imported into the fresh MetaMask app.
Now that we’ve seen how to create a wallet, send crypto to it, and recover the wallet – let’s talk about some common pain points related to Web3 wallets, and why they are intimidating, especially for first-time users. When signing up to your traditional bank, you set your username and password. This username and password exists in your bank’s private database so, if you lose your password, you can initiate a password reset process to regain access to your account. On the other hand, Web3 wallets represent decentralized, self-custody bank accounts. This means no centralized entity custodies your crypto, or manages your account information.
The main implication here is that, if you lose your secret recovery phrase, you lose access to your crypto funds forever, without recourse. There is no centralized service that will help you recover your funds. Imagine you are in custody of gold bars – you are the sole person responsible for remembering where you buried the gold. Losing your secret recovery phrase is the equivalent of forgetting where you buried your gold bars. Self-custody demands a significant amount of responsibility from Web3 users, but some wallets are working to improve this pain point with something called social recovery.
Also, Web3 wallet transactions are irreversible. If you type in your friend’s address wrong, or accidentally send crypto to the wrong person, then the transaction cannot be reversed. Also, if your wallet gets hacked, and the crypto gets drained from it, there’s no recovery process for getting your funds back.
Web3 wallets are a permanent fixture in the Web3 ecosystem. The user will continuously return back to their wallet’s UI to manage their crypto assets, and connect their wallet to decentralized apps. Next we discuss what a Web3 wallet is in terms of features and functionality. Also, we go in-depth on one of the most common user flows within a Web3 wallet: sending crypto to other wallets.
If you enjoy videos over reading when it comes to online learning then checkout the course on YouTube. This is part 3 of 9 in the Web3 Design Course 2022. Also, make sure to stay tuned for future Web3 Design Courses where we will get into more interesting topics about emerging dApps.
0 Comments