- Introduction
- Onboard to Exchange & Purchase Crypto
- Create Web3 Wallet & Receive Crypto
- Manage Crypto in Wallet
- Connect Wallet to Decentralized Applications
- Web3 Wallets and Cryptographic Keys
- Decentralized, P2P Blockchain Networks
- Sending Transactions to the Blockchain
- Interacting with dApps on the Blockchain
Introduction
This course will introduce you to fundamental Web3 design patterns and mental models. Learning these concepts is more than enough to become a Web3 product designer as it will place you in the top 10% of designers in the world when it comes to familiarity with crypto and Web3. The course is structured as a user journey for onboarding to Web3. Going step-by-step through this journey will show you the UX of decentralized applications (dApps), and help in building empathy for Web3 users in general.

It starts when users connect their bank account to a crypto exchange, and purchase cryptocurrency. A large emphasis is placed on this step – it’s known as the “on-ramp” to cryptocurrencies. Users exchange their fiat currencies (e.g. USD) for cryptocurrencies (e.g. ETH). The UX for purchasing crypto differs between exchanges, but significant friction points are present on all of them.
The cryptocurrency that users purchase on an exchange is being custodied by that exchange. Users must self-custody their crypto in order to take full advantage of the Web3 ecosystem, and its decentralized applications. Users first create a Web3 wallet then send crypto from the exchange to the wallet. This marks an important transition from using centralized products (i.e. banks and exchanges) to using decentralized, blockchain-based products (i.e. wallets and dApps).
Web3 wallets can be thought of as anonymous bank vaults. Anyone can create one, and users don’t need to reveal their identity (unlike banks and exchanges) in order to do so. Within Web3 wallets, users manage their crypto assets like checking token balances, and sending crypto to other wallets.
Finally, wallets are connected to decentralized applications (i.e. dApps). This is how users access the Web3 ecosystem. Web3 dApps are distinctly different from the Web2 applications we’re accustomed to using (e.g. Facebook and Twitter). Decentralized applications are built on top of blockchains, rather than centrally-managed servers and databases. The dApp ecosystem is experiencing rapid growth, and new categories of Web3 products are being built out, like decentralized social media, data, identity, gaming, and much more. We’ll cover these emerging categories in detail in later Web3 Design Courses.
So that’s an overview of the Web3 user journey. In the sections that follow, we’ll go more in-depth on each one of the four phases. After discussing the phases, touch on more advanced concepts like what a Web3 wallet is on the backend, what is a blockchain and P2P network, and how Web2 apps differ from Web3 dApps in terms of software architecture. By the end of this Web3 Design Course, you’ll have a solid understanding of Web3 concepts, design patterns, and the underlying blockchain technologies.
There’s also a video version of the entire course on YouTube.
Onboard to Exchange & Purchase Crypto
Crypto is the currency of the Web3 ecosystem, and is required to access decentralized applications. So how do users first get cryptocurrency? This is where crypto exchanges come in.
Exchanges are known as the “on-ramp” to cryptocurrency, because it’s where users convert their fiat currencies into cryptocurrencies. Let’s talk about the user journey for onboarding to crypto exchanges, and purchasing cryptocurrency on them. Product designers put a large emphasis on crypto exchange onboarding, because the UX has been bad in the past and user friction still exists today.
Before writing this, I onboarded to four crypto exchanges (Coinbase, Kraken, Crypto.com, and Gemini), and tested the user experience of each. Coinbase by far had the best UX of all crypto exchanges I looked at. It’s one of the most mature Web3 companies as it has been running since 2012, it went public in 2021, and it continues to build a robust team of UX designers and researchers. In my opinion, Coinbase is the gold standard of crypto exchange UX at this time.
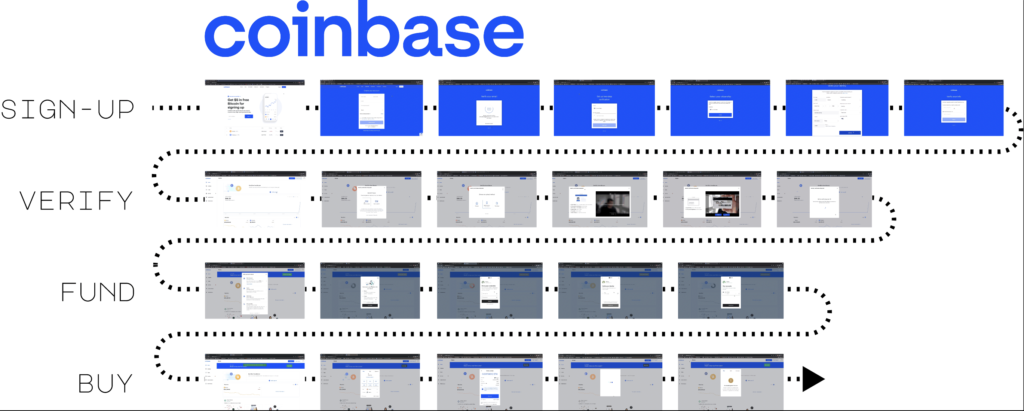
Before we get into the specifics, understand that the user flow is broken into four phases on all exchanges: sign-up to the exchange, verify your identity to meet government KYC/AML requirements, transfer funds from your bank account to the exchange, and, finally, purchase crypto.
Sign-up is similar to other web services. The user creates an account with an email username, and sets a password. They receive email verification, and text verification for 2FA. Nothing abnormal yet.
The UX starts to degrade in the next phase where the user must verify their account. In other words, the user must prove their identity using government issued documents (i.e. passports, drivers licenses) in order to use the exchange. This account verification has to do with the exchange complying with KYC (Know-Your-Customer) and AML (Anti-Money Laundering) regulation. Basically, the exchange is considered a bank, and governments want to control who has access to these banking services.
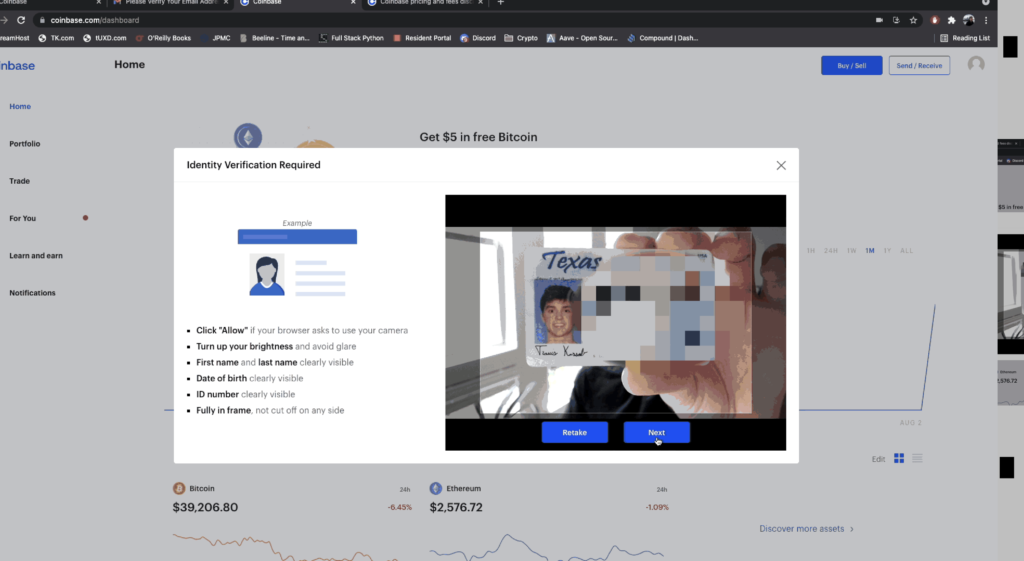
Most would agree that we shouldn’t let terrorists, criminals, and other sanctioned individuals use banking services; however, for the average user, this account verification step poses a couple problems. First, account verification requires the collection of sensitive information like residential address, social security number, and government-issued documents (e.g. passports and driver’s licenses). I think we all know privacy-conscious people who wouldn’t feel comfortable providing this information to a crypto exchange, and submitting it over the internet for that matter. Looking at you mom and dad.
Also, users are not told how long the account verification process will take. Admittedly, it only took one minute for me to receive a confirmation email from Coinbase, but this could still prevent people from setting up an account and purchasing crypto all in one sitting. Kraken and Crypto.com took 5-10 minutes for account verification. My account verification on Gemini is still pending, over 6 months later.
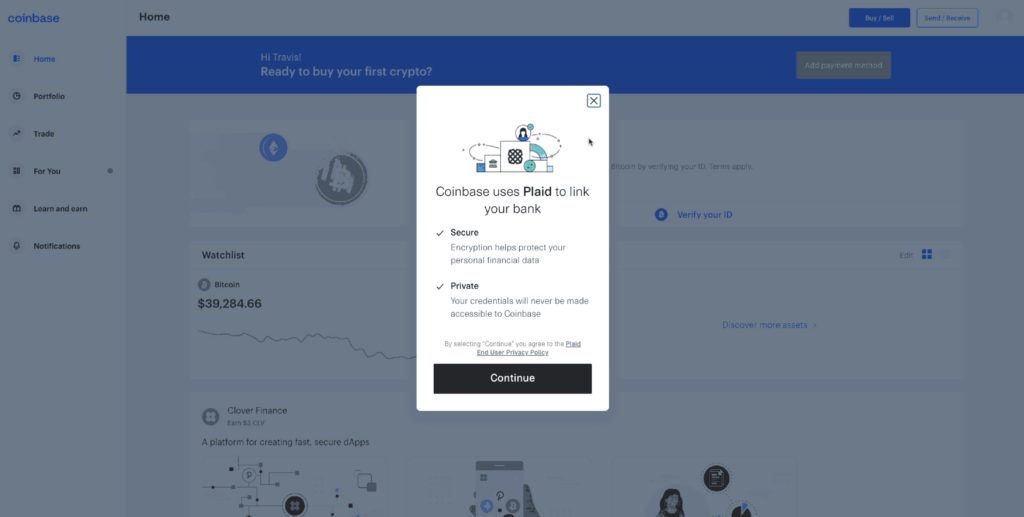
Now, the next step in this journey is for users to connect their traditional bank account to the crypto exchange. This has to do with landing fiat currency into the crypto exchange so that it is available to purchase the cryptocurrency with. Exchanges provide a variety of transfer methods, such as ACH transfer, Bank Wires, PayPal, and Debit cards. These methods differ in terms of transfer limits, transfer fees, and how long it takes to land fiat in the account.
Coinbase integrates with a third-party service called Plaid to make the ACH transfer process more user-friendly. Connecting my bank to Coinbase via Plaid took only 30 seconds, and I was ready to purchase cryptocurrency from there. This is where Coinbase really starts to set itself apart from the others. When using the other exchanges, I was forced to open a new browser tab, log into my bank account and manually initiate bank wire transfers into the exchange. I was not charged any fees; however, the funds took 24-48 hours to land in the exchange. You can imagine how much more this disrupts the user flow compared to Coinbase’s seamless ACH transfer.
Finally, once fiat has landed in the exchange, the user is able to purchase cryptocurrency. It’s a simple process on all exchanges. The user selects which cryptocurrency they want to purchase and how much of it, denominated in their fiat currency.
That’s a summary of what happens on a crypto exchange, and we highlighted some major friction points along the way. Next, we’re going to talk about Web3 wallets, look at the process of creating one, and sending crypto from the exchange into the wallet. This is where we bridge the gap between Web2 and Web3, this is where we go from centralized custody to decentralized, self-custody.
Create Web3 Wallet & Receive Crypto
Now that we have crypto in our exchange account, we’ll want to create a Web3 wallet so that we can move our crypto from the exchange into the wallet. This is where the world of Web3 decentralization begins, and there’s a lot that will be new here for first-time Web3 users. Let’s start by creating a wallet with the most popular crypto wallet app, MetaMask.
MetaMask is a Chrome browser extension that can be downloaded through the Google extension store. There are other types of wallets like desktop and mobile apps, but browser extensions are the most popular form factor for Web3 wallets. Let’s now look at the process for creating a Web3 wallet.
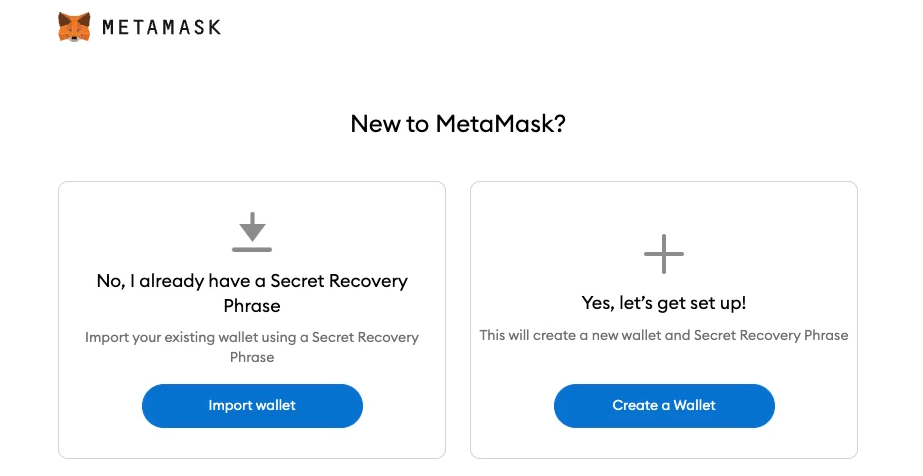
First, users need to install the MetaMask extension on their Chrome browser. Clicking on the MetaMask extension will launch an onboarding screen for MetaMask, and there are two user flows from here: create new wallet and import existing wallet. The ladder has to do with recovering a wallet, which we’ll look at later. For now, we will create a new wallet.
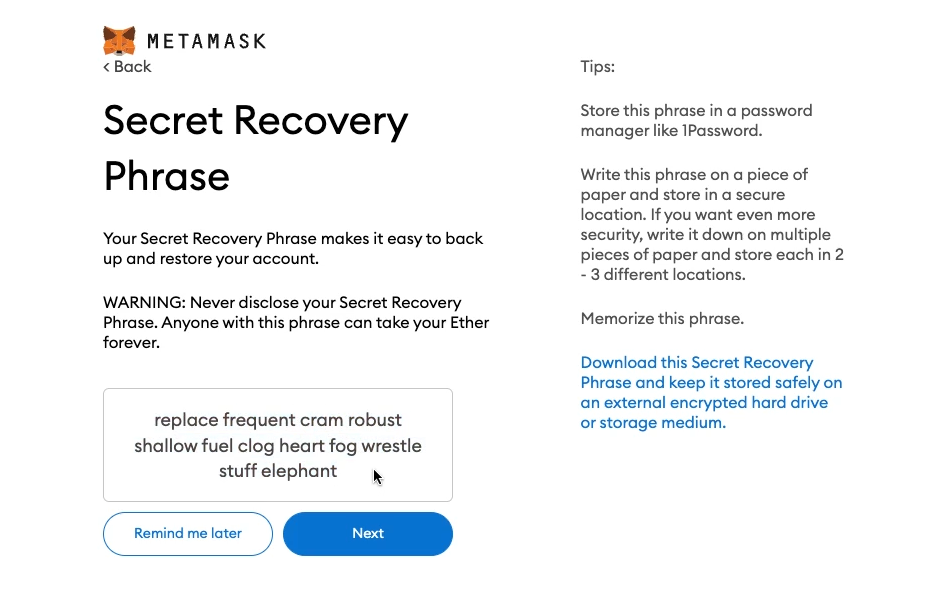
MetaMask generates a new wallet, and displays something called a “secret recovery phrase” for the user to copy. Skip to this later section if you’re interested in the cryptography that MetaMask uses to generate wallets. The secret recovery phrase is a series of 12 to 24 everyday words, and is the master password for the Web3 wallet. Anyone with this phrase can import the wallet into their MetaMask application, and access the crypto associated with the wallet. Users usually write this down on a physical piece of paper, and store it somewhere safe (like a safety deposit box) for security reasons. On the next screen, MetaMask requires the user to retype the secret recovery phrase to ensure the user copied it down correctly in the first place.
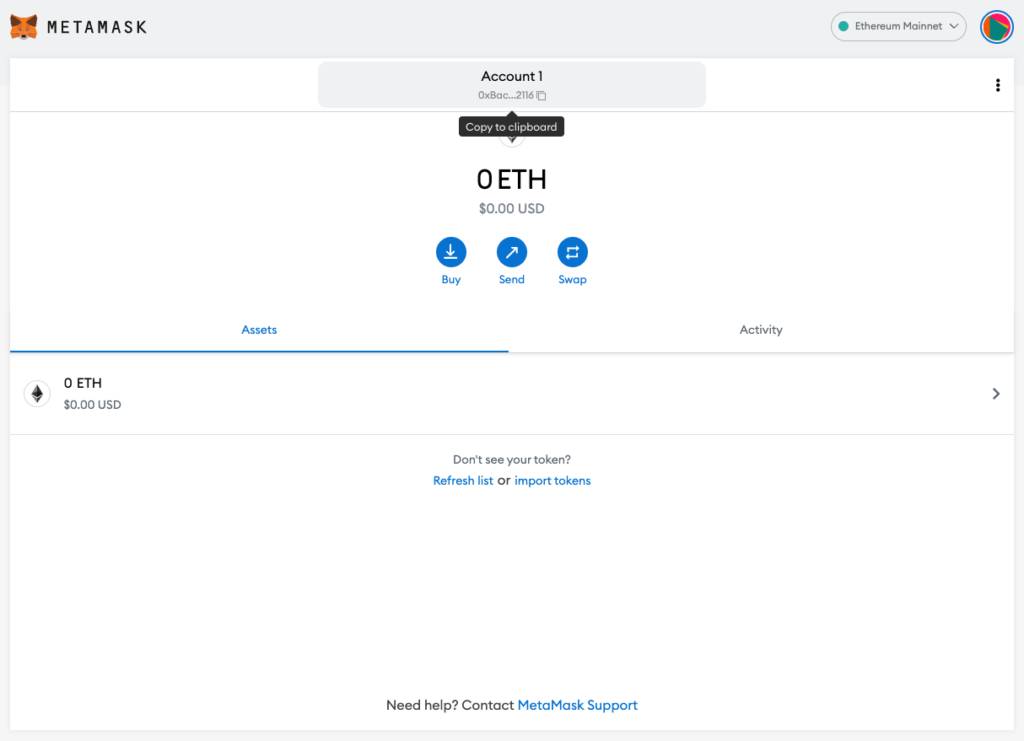
Users can access the wallet’s main UI once the secret recovery phrase has been backed-up. The next section goes in-depth on the features and design patterns of a Web3 wallet, but for now we will just look at the wallet’s address at the top center of the UI. The address is a unique, public identifier for the wallet, and we copy it to our clipboard in order to send crypto from the exchange into the wallet. You can think of the wallet address like an email address. Remember, sending crypto from the exchange to the wallet is an important transitory step to go from centralized apps to decentralized apps.
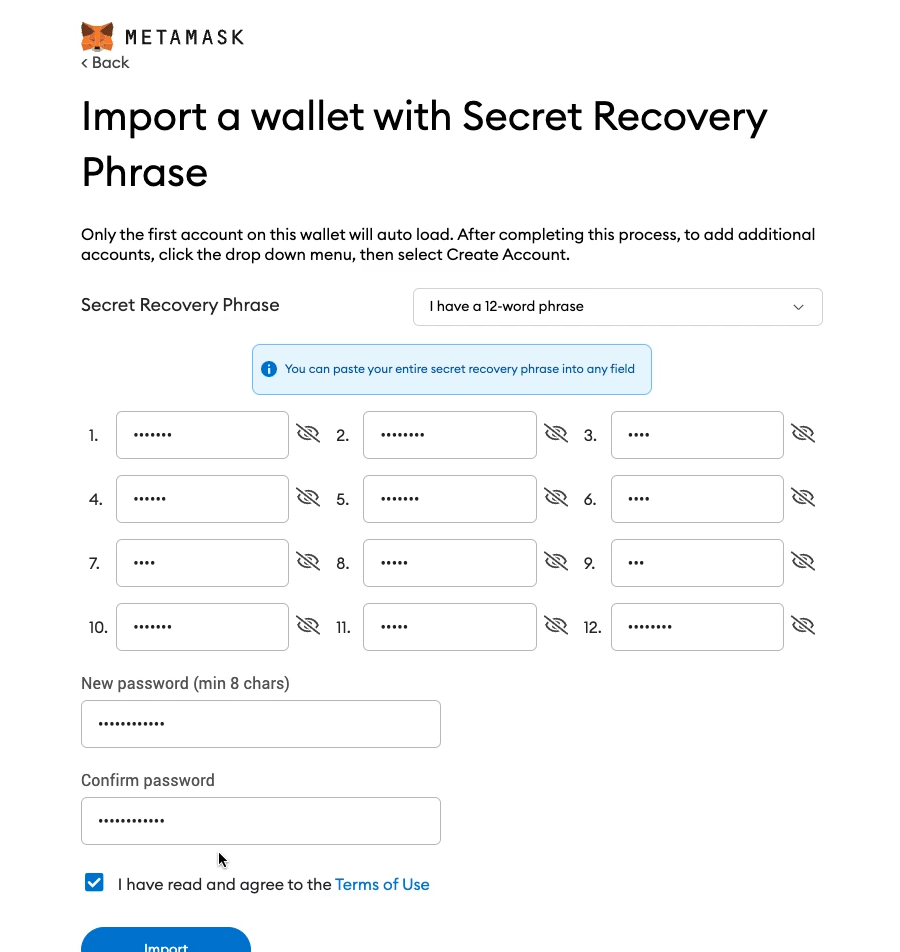
Now, let’s say you change computers, and need to redownload MetaMask. Or your MetaMask extension gets deleted from Chrome. In order to regain access to your wallet, you’ll need to recover your wallet using your secret backup phrase. Let’s see how this works by going back to the initial MetaMask onboarding screen, and importing an existing wallet. The user simply enters the secret recovery phrase, and their Web3 wallet gets imported into the fresh MetaMask app.
Now that we’ve seen how to create a wallet, send crypto to it, and recover the wallet – let’s talk about some common pain points related to Web3 wallets, and why they are intimidating, especially for first-time users. When signing up to your traditional bank, you set your username and password. This username and password exists in your bank’s private database so, if you lose your password, you can initiate a password reset process to regain access to your account. On the other hand, Web3 wallets represent decentralized, self-custody bank accounts. This means no centralized entity custodies your crypto, or manages your account information.
The main implication here is that, if you lose your secret recovery phrase, you lose access to your crypto funds forever, without recourse. There is no centralized service that will help you recover your funds. Imagine you are in custody of gold bars – you are the sole person responsible for remembering where you buried the gold. Losing your secret recovery phrase is the equivalent of forgetting where you buried your gold bars. Self-custody demands a significant amount of responsibility from Web3 users, but some wallets are working to improve this pain point with something called social recovery.
Also, Web3 wallet transactions are irreversible. If you type in your friend’s address wrong, or accidentally send crypto to the wrong person, then the transaction cannot be reversed. Also, if your wallet gets hacked, and the crypto gets drained from it, there’s no recovery process for getting your funds back.
Web3 wallets are a permanent fixture in the Web3 ecosystem. The user will continuously return back to their wallet’s UI to manage their crypto assets, and connect their wallet to decentralized apps. Next we discuss what a Web3 wallet is in terms of features and functionality. Also, we go in-depth on one of the most common user flows within a Web3 wallet: sending crypto to other wallets.
Manage Crypto in Wallet
Wallets are central to using the Web3 ecosystem – users continuously return back to wallets in order to view their account balances, and send crypto to other wallets. Before we get into these features, let’s talk about the properties of Web3 wallets.
First, Web3 wallet’s are “permissionless” bank accounts. They are permissionless because anyone can download, create, and use a wallet without the permission of an authority like a government or bank. Also, Web3 wallets are “anonymous” bank accounts. Unlike traditional bank accounts, Web3 wallets do not require identity verification. Finally, Web3 wallets are “censorship-resistant”. Recently, we’ve seen governments freeze the bank funds of its citizens. This cannot be done with cryptocurrency managed by Web3 wallets.
As a side note, Web3 wallets are actually much more than a bank account. Their most obvious function is to custody cryptocurrency, but Web3 wallets also hold other digital items like artwork (i.e. NFTs), and will eventually be used to manage user data, identity, and more. These emerging use-cases will be covered in future Web3 Design Courses.

Now let’s briefly talk about the features within a Web3 wallet. Of course users can check their account balance at the top, which shows how much ETH is in the wallet. Wallets can hold other tokens in the “Assets” tab, which we’ll see in the next section when we swap ETH for DAI. The “Activity” tab on the right shows a history of the incoming and outgoing transactions associated with the wallet. At the top middle is the “Account”, which users click in order to copy the wallet address to their clipboard. Just above “Account” is the “Network” where users can change blockchain networks. MetaMask is connected to “Ropsten”, an Ethereum testnet blockchain, in the image above. Developers use testnets to debug their apps before deploying to “Ethereum Mainnet”. Finally, to the left of “Account” there is a “Not connected” button. This UI element turns green when the wallet is connected to a dApp, which we’ll see in the next section.

One of the most commonly used features in a Web3 wallet is “Send” – a user flow for, you guessed it, sending crypto from one wallet to another. This user flow contains two new concepts for first-time users: network fees and confirmation delays. Let’s walk through a send flow step-by-step to understand how network fees and confirmation delays impact the UX of Web3. First, users start by copying the address of the wallet they want to send ETH to, and paste it into the first field. They then enter the amount of ETH to send in the bottom field.
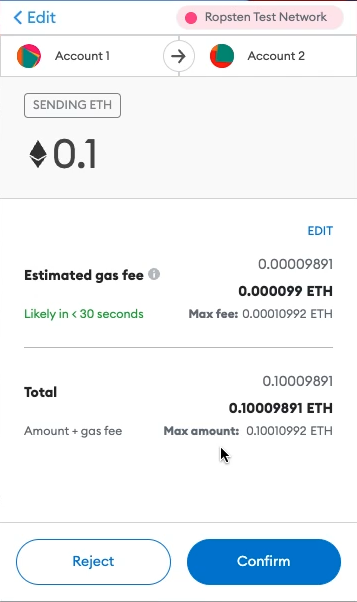
The next confirmation screen shows a summary of the transaction, along with the “Estimated gas fee” and a time estimate underneath that (i.e. “Likely in <30 seconds”). This gets back to the network fee and confirmation delay we talked about before. Blockchains are decentralized databases that Web3 modify with their wallets. When someone sends crypto from one wallet to another, we are essentially updating two account balances stored on the blockchain. In other words, the send transaction results in one account being decreased by some amount of ETH, and the second account increased by some amount of ETH.
Remember, the blockchain is a decentralized database. Thousands of nodes store a copy of the blockchain, and must coordinate to update their local blockchains and stay in sync with one another. All this is to say that writing to a blockchain database is much more complex, and expensive, than writing to a centralized database run by one entity. Web3 users pay network fees to these nodes to incentivize them to continue running the blockchain network. I know I just threw a lot at you. Don’t worry if you don’t understand everything – we’ll talk about blockchains, and how transactions flow through them in later sections.

After pressing “Confirm”, users can go to the “Activity” tab to view the status of the outgoing send transaction. The status starts as “Pending”, and after a bit of time, changes to “Confirmed”. Think back to what I said before – thousands of nodes are coordinating to update the blockchain. This takes time to do. It’s much faster to update VISA’s central database than to update the decentralized blockchain. I’ll leave the details of how this actually works for a later section.
Block confirmations, and network fees are the two important takeaways from this section as they directly impact the UX of all Web3 products. Users must pay the nodes that maintain the underlying blockchain in order to use Web3 products, and users also experience a delay in transaction confirmation. Note that blockchains are actively trying to solve UX pain points related to high network fees and long confirmation times. Look into Ethereum Layer 2 scaling and the Solana blockchain to see how UX is moving in the right direction.
Send is one of the main user flows within Web3 wallets, but admittedly not very interesting. There are already many apps out there for sending fiat like PayPal and Venmo. In the next section we will venture all the way into the Web3 ecosystem and connect our wallet to a decentralized application called Uniswap.
Connect Wallet to Decentralized Applications
Decentralized applications, or dApps, are typically web applications that utilize the blockchain as their backend. This is what makes a dApp decentralized. In the last section, we’ll cover the specifics of dApp software architecture, but for now, we’ll only focus on what the end-user sees when using Uniswap.
Uniswap was one of the first dApps to gain product-market fit in the Web3 ecosystem. It’s a decentralized exchange (i.e. “DEX”) that allows users to swap one token for another. Of course, you can buy and sell tokens on crypto exchanges; however, Uniswap is different in that there are no intermediaries facilitating the trade, or custodying the tokens along the way. Instead, Uniswap, and other decentralized exchanges, run on software deployed to a blockchain that facilitates this token swap in a “trustless” way.
When I say, “trustless” I mean that neither I, nor the strangers I’m swapping with, have to trust each other, or any other centralized entity, to make this swap. All we need to trust in is the objectivity, and deterministic nature of the blockchain. Also, Uniswap’s code is open-source, and can be audited by anyone to ensure that it will execute in the way it’s expected to. “Trustlessness” is a fundamental property of Web3. Let’s walk through swapping tokens on Uniswap.
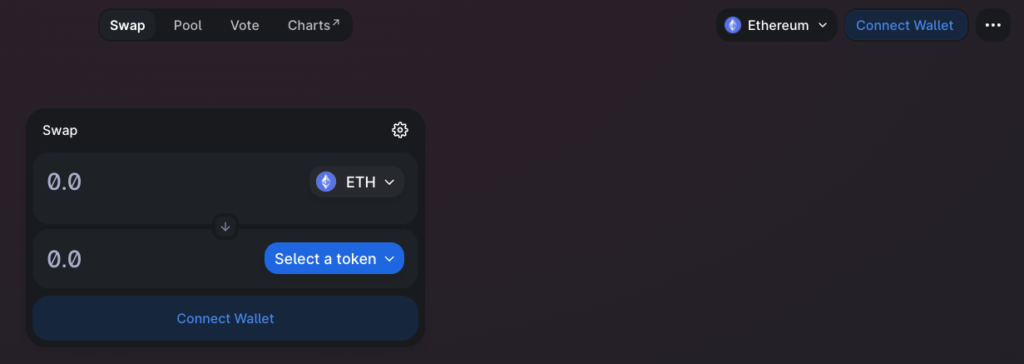
It starts with a fundamental Web3 design pattern: connecting a wallet to the dApp.
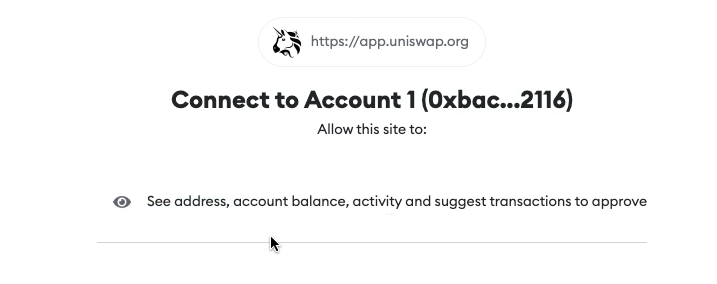
A MetaMask popup requires users to confirm this connection request, and allow Uniswap to access their wallet address, account balance, activity, and suggest transactions. Connecting the wallet does not give dApps access to user private keys (i.e. the secret recovery phrase we’ve discussed prior).

Users know the wallet has been connected once their wallet address, and ETH balance, displays in place of the “Connect Wallet” button.

On the Uniswap UI, users select the token they want, and how much of Token A they want to swap.

MetaMask then displays a transaction confirmation screen. This screen should look familiar, because it’s the same confirmation screen that displays during the send flow. Note that the two concepts we talked about in the previous section, network fees and confirmation delays, apply when using Uniswap, and all other dApps for that matter.

Once the Uniswap transaction has been confirmed, users can check that the new token has landed in their wallet.
You may be surprised just how similar this Web3 dApp looks compared to all the Web2 applications that we use on a daily basis. The tech stack used to implement the UI is the same between Web3 and Web2. Both use programming languages like HTML, CSS, and Javascript to build out the frontend UI. The difference comes in when talking about the backend. Web3 backends are built using decentralized blockchains as opposed to the centralized servers of Web2. This is what makes the dApp “decentralized”, and is the source of the unique Web3 properties like “trustless”, “permissionless”, and “censorship-resistant”.
That concludes the user-journey of onboarding into the Web3 ecosystem. We went from fiat money, purchased crypto with it on an exchange, created a Web3 wallet, and transferred the crypto from the exchange into the wallet. We sent crypto to another wallet, and finally connected the wallet to a decentralized application.
You’ve seen the UX and popular design patterns of flagship Web3 products like wallets and dApps. Future Web3 Design Courses will cover the emerging categories of the Web3 ecosystem. The content will give you a means to look beyond the cutting-edge, and envision the next disruptive developments in the Web3 space. The remaining sections of this article go more in-depth on what’s happening when you create a wallet, send crypto to another wallet, and use a dApp.
This will be good for designers interested in building simple mental models of the technologies that underlie Web3. I believe it’s important to have a basic understanding of what is happening on the backend to be an effective designer. Building this understanding, along with what you’ve already learned, is all the preparation you need to become a Web3 product designer.
Web3 Wallets and Cryptographic Keys
You may be wondering where “crypto” comes into play when talking about Web3. Cryptography pervades everything we’ve talked about thus far. It’s the basis for how the average user can self-custody their cryptocurrency, and other digital assets; however, it’s not experienced directly by users. And thank god for that.
We’d be in trouble if users needed an understanding of cryptography in order to use Web3 products. I do think it’s helpful for Web3 product designers to get a base-level understanding of what a Web3 wallet is on a technical-level, and what exactly happens when a Web3 wallet gets created.
Let’s start off slow, with a concept that is highly counter-intuitive, and will take you weeks to wrap your head around. Not bad for cryptography. To create an Ethereum wallet, you essentially choose a number between 1 and 2^256. The number that you choose is the private key, essentially the password for your Web3 wallet. Let’s talk numbers for a second. 2^256 is a very large number. It’s 78-digits and looks like this…

This is counter-intuitive – that we create our wallet password by randomly picking a number within a set range. Couldn’t someone else randomly guess our wallet’s password by guessing passwords all day? Couldn’t an evil developer code a bot that guesses thousands of private keys per second, checks if the private keys control crypto and, if any do, transfer the crypto to the developer’s wallet? The answer is yes, and yes.
It’s possible for someone to randomly guess your private key and steal your crypto. But the range of private keys is so large (as we just saw above) that it’s practically impossible for anyone guessing in this range to collide with a number that someone else has already guessed. In fact, there are almost as many Ethereum private keys as there are atoms in the Universe (~10^80). The most important thing is that the application creating your wallet randomly selects a number in the range. It’s not advised to choose the number 1, 100, or 1M as a private key.

Now that you understand what a private key is – a random 78-digit number – let’s talk about public keys, and wallet addresses. There is a set process for deriving a public key and address from the private key. Elliptic Curve Cryptography is used to derive the public key from the private key, and the public key is hashed to derive the address from this public key. An explanation of these cryptographic functions is beyond scope, but just understand that the public key, private key, and address are connected to one another. The private-public keys are called “key-pairs”. And this is essentially what an Ethereum wallet is, a private-public key pair. Wallet applications, like MetaMask, manage your key pairs, search the blockchain to see what the balance of your wallet address is, and sign transactions with your private key in order to send crypto, or use dApps. A later section goes more into this process of signing transactions, and sending them to blockchain nodes.

If you read one of the previous sections where we created the wallet you’ll wonder why we’re talking about numeric private keys when, in fact, MetaMask generated a 12-word secret recovery phrase. These 12-words are called mnemonic phrases, and were one of the first major UX improvements in crypto. Rather than making someone write-out a 78-digit number, which could easily be copied incorrectly, users just have to copy a series of 12 everyday words. Wallet apps implement a process for randomly generating this mnemonic phrase, and from the mnemonic phrase, multiple sets of private-public key pairs are derived. This, in itself, is a major UX improvement, because now users can create multiple crypto wallets, each with their own account balances, that can all be recovered using the same secret recovery phrase. You can play around with creating wallets, and seeing how the keys get derived on the backend here.
Okay, so we’ve just learned what happens when you create a Web3 wallet. Wallet apps equip Web3 users with high-grade cryptography that enables them self-custody their digital assets. This is revolutionary, and its importance cannot be understated. Crypto wallets, and blockchain technologies, will fundamentally change how we interact with most software products moving forward.
At this point we understand that the wallet communicates with decentralized applications, and the blockchain, but your understanding of what exactly a blockchain is may still be murky. This is what we’ll tackle in the next section – an explanation of decentralized, peer-to-peer networks.
Decentralized, P2P Blockchain Networks
Blockchains are decentralized, peer-to-peer networks. That’s a lot to take in at first, so let’s start with concepts that are familiar to us. Let’s look at how Web2 applications function on the backend.

In Web2, computers, smartphones, and tablets talk to servers, and data stores, that are hosted on centralized servers owned by companies like Facebook, Twitter, and Google. These devices, also known as “clients”, use internet protocols like HTTP and TCP/IP to communicate with the centralized servers, and access the web apps. This is what the Web2 internet looks like, and what people have been accustomed to for the past 20 years.

Web3 changes this paradigm. Instead of applications hosted on centralized servers, applications in Web3 are distributed across nodes on a peer-to-peer network. Nodes connect to one another, and no single node “owns” the network, or gets special privileges on the network. In other words, unlike Web2, no single person or company controls access to the network, and has the unilateral right to update the database. Instead, nodes in Web3 must come to consensus with one another, and agree on how to update the blockchain database based on a common rule set. If a node decides to not follow the rule set then it will be unable to participate in the network in the first place.
In general, nodes are made up of clients and validators. As we’ve seen in previous sections, Web3 users run wallet software (e.g. MetaMask) on their devices, and send transactions from their wallet in order to transfer crypto, or use dApps. These transactions are sent to, and received by, the validators. Validators are the nodes that do all the work to keep the blockchain running. They all have a local copy of the blockchain, and update the blockchain, by creating new blocks, with the incoming transactions from clients. Remember, no single validator has control over the blockchain, the decision-making is distributed across many validators.

Validators are simply computers running Ethereum node software. In fact, if you wanted to, you could download Ethereum node software to your personal computer, and join the network as a validator. To put it simply, validators do all the work necessary to run the Ethereum blockchain. If you look up real-time stats of Ethereum validators you’ll see that there are thousands of validators on the network, globally distributed across the world. Decentralization results in special properties for the blockchain, and the dApps running on it: resilience and fault-tolerance. Let’s say that the entire UX power grid shut down, and all US nodes went offline. The network would lose 37% of its nodes, but the remaining nodes would continue uninterrupted. This means that the blockchain data (i.e. the history of all transactions) would persist, and decentralized services would continue running.
Now that we know more about what validators are, you may wonder what they actually do to run the network. Essentially, validators are responsible for maintaining the blockchain database locally on their computer. This ensures that the database is distributed and not owned by any single entity. Also, they are responsible for updating the blockchain. In other words, validators create new blocks, adding it to the tip of the current blockchain. Validators propagate new blocks to the rest of the network, so that other validators can check the block, and add it to their local blockchain. Don’t get hung up on the details – this probably won’t make a lot of sense at this point. We’re going to look at this process step by step in the next section. Just understand that validators dedicate their time and resources to maintain the Ethereum network. A reasonable next question might be: why do validators endure these costs to continue running the network?
The incentive is clear, and this is the genius of blockchain networks. Blockchains reward the nodes that run, secure, and support the network with the blockchain’s native coin. On Ethereum, it’s ETH. On Bitcoin, it’s BTC. And so on. As many of you will know, these coins have real monetary value, so there’s financial incentive to not only run the network, but abide by the network’s rule set to ensure maximum return. This token incentive mechanism just described is at the heart of blockchain networks, and decentralized applications. It will be a theme you will continue to see throughout the Web3 ecosystem. We’ll talk more about tokens in later Web3 Design Courses.
In summary, blockchains are made up of a network of distributed nodes that communicate directly with one another. Validators do the work to maintain, and update the blockchain, and they do this to earn rewards paid in that blockchain’s native coin. Next, we’re going more in-depth on how the blockchain gets updated, from a client sending a transaction, to a validator including it in a block, to that block getting propagated out to, and accepted by, the rest of validators on the network.
Sending Transactions to the Blockchain
In this section we’re going to talk about what happens on the Ethereum when a crypto wallet sends ETH to another wallet. We’re going to follow this transaction from beginning to end, from the time it’s sent from the crypto wallet, to when it is added to a block, and when the block gets propagated to the rest of the network. This will give us a good idea of the role that nodes play on the blockchain network.

It starts when Web3 users initiate a send transaction from their wallet app. Think of a transaction as a packet of data that contains all the pertinent information, like “from”, “to”, and “amount”. Of course this is an oversimplification, but this has been an adequate mental model of a transaction’s structure for me as a product designer. Next, the wallet signs the transaction with the wallet’s private key. This is called a digital signature and, again, the details are more of a computer science topic than a design topic. The signed transaction is sent to an Ethereum validator who checks that the signature matches the wallet’s public key. Remember from the cryptography section that the private key and public key are intimately related to each other – they are called a key pair. If the signature matches, the transaction is considered valid, and the validator accepts the transaction into its mempool for temporary storage. This process of signing transactions and checking that the signature matches is what secures the user’s crypto, and ensures that only someone with the private key can spend that wallet’s crypto.

Let’s pause for a moment, and talk about blockchains and their constituent blocks. Validators assemble new blocks with the transactions in their mempool. Again, this is an oversimplification, but a block is a larger data packet made up of transactions and some unique information that connects it to the last block. Every block connects back to the previous block, and this goes all the way back to the genesis block. The genesis block is the first block on the blockchain, and initiated the Ethereum blockchain on June 30th, 2015. Since then, the blockchain has been built up, block by block. So the blockchain is simply a record of all the confirmed transactions from the genesis block onward. A validator creates a new block, roughly every 12 seconds on Ethereum, with the confirmed transactions that have been received since the last block.

Now that a validator has created a new block, the validator sends the block out to the rest of the network. This is called block propagation, and goes back to the fact that the network is decentralized, and no single validator has the authority to update the blockchain. The validator essentially proposes the new block to other validators, who check that the new block meets certain criteria, and if it does, the other validators add it to their local blockchain. This is how the blockchain gets updated.

When all the validators have the same blockchain, updated with the newest block, then the transactions within the newest block go from pending to confirmed. Thus, Web3 users must wait for their transactions to be included in a block, which has to do with the block confirmation delay we initially discussed in a previous section.
Also, remember how Web3 users must pay a network fee with every transaction they send. And blocks are made up of these transactions. Every time a new block is created, the network fees get distributed to the validators participating in the network at that time.
To bring this back to our original example of sending crypto to a friend, my send transaction was included in a block, and the validators added the block to their blockchain. This is when my transaction went from pending to confirmed. My wallet’s account balance was decreased by X + F ether, my friend’s account balance was increased by X ether, and F ether was distributed to the validators.

Last thing to discuss – Ethereum is a public blockchain meaning that the data is open for anyone to see. There are tools called block explorers that are great for looking at the status of the network in terms of what was the most recent block, when it was created, and by which validator. Also, you can see all the transactions that were included in a block. Further, you can look into transactions and see the wallet address from which it originated, which address it was sent to, and the amount that was sent.
In summary, we looked at what happens behind the scenes when one wallet sends ETH to another. And we now understand the roles of each node on the Ethereum network. Clients, running crypto wallet software are responsible for assembling raw transactions, signing raw transactions with the wallet’s private key to legitimize them, and sending these signed transactions to validators on the blockchain. Also, the wallet software queries the blockchain to get the status of the transaction, whether it’s pending, or if it’s been confirmed. Also, the wallet app queries the wallet’s address to return information like token balance, which then gets displayed on the UI for the user to see.
Finally, validators are responsible for receiving incoming transactions, and checking the legitimacy of these transactions. They create new blocks to update the current state of the blockchain by bundling these confirmed transactions, and send the new block on to other validators so that it propagates across the network. The other validators check that the block is valid, and then accept it and add it to their blockchain. This is how the blockchain gets updated, and all validators end with the same copy of the blockchain, stored locally on their computers.
Interacting with dApps on the Blockchain
Now that we’ve learned what a blockchain is, and understand how transactions flow through the network, let’s return back to decentralized applications, or dApps. In a previous section, we looked at Uniswap, a dApp that facilitates token swaps. In this section, we will break down what exactly a dApp is. We’ll start by quickly reviewing the software architecture of Web2 applications then compare it to that of Web3 dApps.

Web2 applications are hosted on a company’s centralized server. At a high level, the web app has a frontend, backend and database associated with it. A user’s computer communicates with the company’s server using internet protocols, and frontend code (e.g. HTML, CSS, and Javascript) is sent to the user’s computer where it is then rendered into a UI within an internet browser. Because of this centralized software architecture, the company has unilateral rights to update the application’s code and modify its database. And for good reason as this is how new versions of web apps get deployed to user communities; however, companies can do a number of things like censor user content, and even outright ban users from their web apps. What’s more, Web2 companies often monetize user content and data via advertising. In other words, the companies earn massive profits while the users who generate content, and make up the site traffic, capture little of the value they create. This is counterintuitive, but has become normalized as it’s been the dominant internet business model over the past 20 years. We’ve never known of anything different until now.

Web3 disrupts this paradigm with decentralization. Like Web2, frontend code is still rendered into a UI with internet browsers, but the dApp’s backend is where things start to differ. Instead of a centralized server, Web3 dApps deploy backend code to the blockchain with smart contracts, and also utilize the blockchain as a decentralized database. No company owns the dApp, or the blockchain that the dApp leverages. As we saw before, dApps are permissionless so anyone can use them, and the blockchain database can only be updated by a user with their private key.

Now think back to our example of swapping tokens on Uniswap. We connected our wallet to Uniswap, and initiated the swap from ETH to DAI on Uniswap’s UI. On the backend, Uniswap assembles the raw transaction necessary to make this swap. We can imagine the raw transaction contains data like wallet address, how much Ether I want to swap, and how much DAI I expect in return. The transaction also points to the swap function within one of Uniswap’s smart contracts, which is stored on the Ethereum blockchain. But more on this later. We learned from the previous section that the validators will not accept unsigned transactions; therefore, Uniswap sends the raw transaction to a user’s wallet, the wallet app signs the transaction (after the user accepts a MetaMask confirmation popup) with the private key, the signed transaction is sent back to Uniswap, and Uniswap sends the signed transaction to an Ethereum validator.

Now we’re back to what we discussed in the previous section about what happens once a transaction has been sent to an Ethereum node. A validator checks the validity of the signed transaction, includes it in a new block, propagates the new block through the network, and so on. Once this block gets accepted by the other validators then the user’s Uniswap transaction goes from pending to confirmed, his/her account’s ETH balance is decreased by X plus a network fee, and increased by Y DAI. The swap is complete.
Remember dApps deploy their backend code to the blockchain in the form of smart contracts. One of the main features of Uniswap is, of course, its swap functionality, so, somewhere, in one of its smart contracts, we’d expect a swap function. When smart contracts get deployed to the blockchain, a contract address is created that looks identical to a Web3 wallet address. This is where the smart contract code lives. Once a smart contract has been deployed to the blockchain it cannot be modified or deleted – it is “immutable”. The smart contract is also permissionless in that anyone can use it, like a public utility. Also, anyone can audit the code, line by line, to ensure that it will execute in an expected manner.

You can think of smart contracts like a vending machine. You put money into a vending machine along with which snack you want, and the vending machine outputs the snack. As we saw before dApps assemble raw transactions that point to smart contract addresses, and the functions within them, to carry out whatever the user requested. ETH is also attached to this transaction to pay the validators for processing the transaction. The transaction passes in parameters to the swap function like wallet address, amount Token A, amount Token B. Finally, the smart contract updates the state of the blockchain accordingly (i.e. user’s ETH and DAI token balance).
9 Comments
UX Design Trends of Crypto Exchanges | Learn Web3 Product Design 2022 – designWeb3 · April 11, 2022 at 10:54 am
[…] when it comes to online learning then checkout the course on YouTube. This is part 2 of 9 in the Web3 Design Course 2022. Also, make sure to stay tuned for future Web3 Design Courses where we will get into more […]
Crypto Wallet App UI | Learn Web3 Product Design 2022 – designWeb3 · April 14, 2022 at 6:46 am
[…] when it comes to online learning then checkout the course on YouTube. This is part 3 of 9 in the Web3 Design Course 2022. Also, make sure to stay tuned for future Web3 Design Courses where we will get into more […]
Crypto Wallet UX Design Patterns | Learn Web3 Product Design 2022 – designWeb3 · April 16, 2022 at 4:58 am
[…] you. Don’t worry if you don’t understand everything at this point – checkout the entire Web3 Design Course 2022 to learn […]
Crypto dApp UX Design Patterns | Learn Web3 Product Design 2022 – designWeb3 · April 18, 2022 at 1:56 pm
[…] when it comes to online learning then checkout the course on YouTube. This is part 5 of 9 in the Web3 Design Course 2022. Also, make sure to stay tuned for future Web3 Design Courses where we will get into more […]
Crypto for UX Designers | Learn Web3 Product Design 2022 – designWeb3 · April 20, 2022 at 11:12 am
[…] when it comes to online learning then checkout the course on YouTube. This is part 6 of 9 in the Web3 Design Course 2022. Also, make sure to stay tuned for future Web3 Design Courses where we will get into more […]
Blockchain for UX Designers | Learn Web3 Product Design 2022 – designWeb3 · April 22, 2022 at 1:36 pm
[…] If you enjoy videos over reading when it comes to online learning then checkout the course on YouTube. This is part 7 of 9 in the Web3 Design Course 2022. […]
Ethereum for UX Designers | Learn Web3 Product Design 2022 – designWeb3 · April 25, 2022 at 10:43 am
[…] when it comes to online learning then checkout the course on YouTube. This is part 8 of 9 in the Web3 Design Course 2022. Also, make sure to stay tuned for future Web3 Design Courses where we will get into more […]
dApps for UX Designers | Learn Web3 Product Design 2022 – designWeb3 · April 27, 2022 at 10:53 am
[…] when it comes to online learning then checkout the course on YouTube. This is part 2 of 9 in the Web3 Design Course 2022. Also, make sure to stay tuned for future Web3 Design Courses where we will get into more […]
Blockchains for Product Designers | Blockchain Design Course 2022 – designWeb3 · May 2, 2022 at 3:37 pm
[…] landscape looks like, and where blockchains are headed in the future. This is an extension of the Web3 Design Course 2022. If you haven’t read that – I recommend starting […]
Comments are closed.