Wallets are central to using the Web3 ecosystem – users continuously return back to wallets in order to view their account balances, and send crypto to other wallets. Before we get into these features, let’s talk about the properties of Web3 wallets.
First, Web3 wallet’s are “permissionless” bank accounts. They are permissionless because anyone can download, create, and use a wallet without the permission of an authority like a government or bank. Also, Web3 wallets are “anonymous” bank accounts. Unlike traditional bank accounts, Web3 wallets do not require identity verification. Finally, Web3 wallets are “censorship-resistant”. Recently, we’ve seen governments freeze the bank funds of its citizens. This cannot be done with cryptocurrency managed by Web3 wallets.
As a side note, Web3 wallets are actually much more than a bank account. Their most obvious function is to custody cryptocurrency, but Web3 wallets also hold other digital items like artwork (i.e. NFTs), and will eventually be used to manage user data, identity, and more. These emerging use-cases will be covered in future Web3 Design Courses.

Now let’s briefly talk about the features within a Web3 wallet. Of course users can check their account balance at the top, which shows how much ETH is in the wallet. Wallets can hold other tokens in the “Assets” tab. The “Activity” tab on the right shows a history of the incoming and outgoing transactions associated with the wallet. At the top middle is the “Account”, which users click in order to copy the wallet address to their clipboard. Just above “Account” is the “Network” where users can change blockchain networks. MetaMask is connected to “Ropsten”, an Ethereum testnet blockchain, in the image above. Developers use testnets to debug their apps before deploying to “Ethereum Mainnet”. Finally, to the left of “Account” there is a “Not connected” button. This UI element turns green when the wallet is connected to a dApp, which we’ll see in the next section.

One of the most commonly used features in a Web3 wallet is “Send” – a user flow for, you guessed it, sending crypto from one wallet to another. This user flow contains two new concepts for first-time users: network fees and confirmation delays. Let’s walk through a send flow step-by-step to understand how network fees and confirmation delays impact the UX of Web3. First, users start by copying the address of the wallet they want to send ETH to, and paste it into the first field. They then enter the amount of ETH to send in the bottom field.
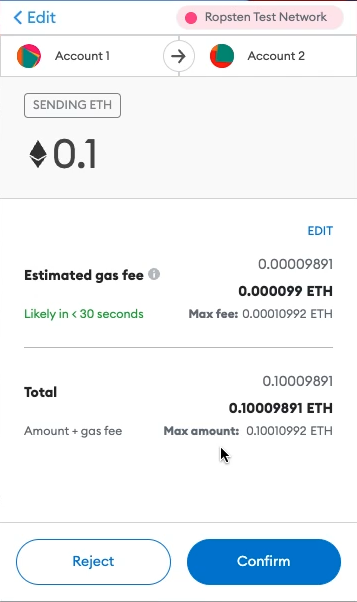
The next confirmation screen shows a summary of the transaction, along with the “Estimated gas fee” and a time estimate underneath that (i.e. “Likely in <30 seconds”). This gets back to the network fee and confirmation delay we talked about before. Blockchains are decentralized databases that Web3 modify with their wallets. When someone sends crypto from one wallet to another, we are essentially updating two account balances stored on the blockchain. In other words, the send transaction results in one account being decreased by some amount of ETH, and the second account increased by some amount of ETH.
Remember, the blockchain is a decentralized database. Thousands of nodes store a copy of the blockchain, and must coordinate to update their local blockchains and stay in sync with one another. All this is to say that writing to a blockchain database is much more complex, and expensive, than writing to a centralized database run by one entity. Web3 users pay network fees to these nodes to incentivize them to continue running the blockchain network. I know I just threw a lot at you. Don’t worry if you don’t understand everything at this point – checkout the entire Web3 Design Course 2022 to learn more.

After pressing “Confirm”, users can go to the “Activity” tab to view the status of the outgoing send transaction. The status starts as “Pending”, and after a bit of time, changes to “Confirmed”. Think back to what I said before – thousands of nodes are coordinating to update the blockchain. This takes time to do. It’s much faster to update VISA’s central database than to update the decentralized blockchain.
Block confirmations, and network fees are the two important takeaways from this section as they directly impact the UX of all Web3 products. Users must pay the nodes that maintain the underlying blockchain in order to use Web3 products, and users also experience a delay in transaction confirmation. Note that blockchains are actively trying to solve UX pain points related to high network fees and long confirmation times. Look into Ethereum Layer 2 scaling and the Solana blockchain to see how UX is moving in the right direction.
Send is one of the main user flows within Web3 wallets, but admittedly not very interesting. There are already many apps out there for sending fiat like PayPal and Venmo. In the next section we will venture all the way into the Web3 ecosystem and connect our wallet to a decentralized application called Uniswap.
If you enjoy videos over reading when it comes to online learning then checkout the course on YouTube. This is part 4 of 9 in the Web3 Design Course 2022. Also, make sure to stay tuned for future Web3 Design Courses where we will get into more interesting topics about emerging dApps.
0 Comments